
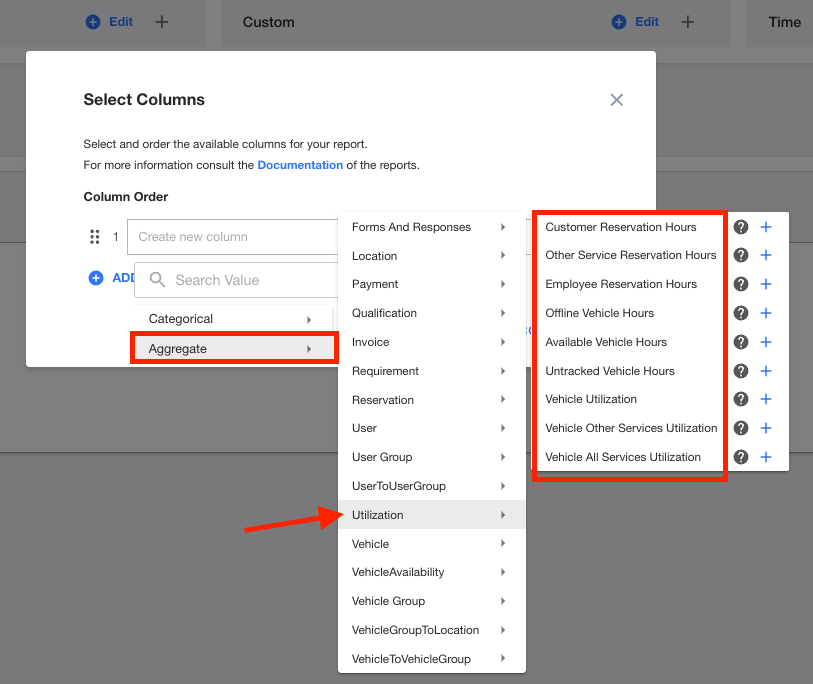
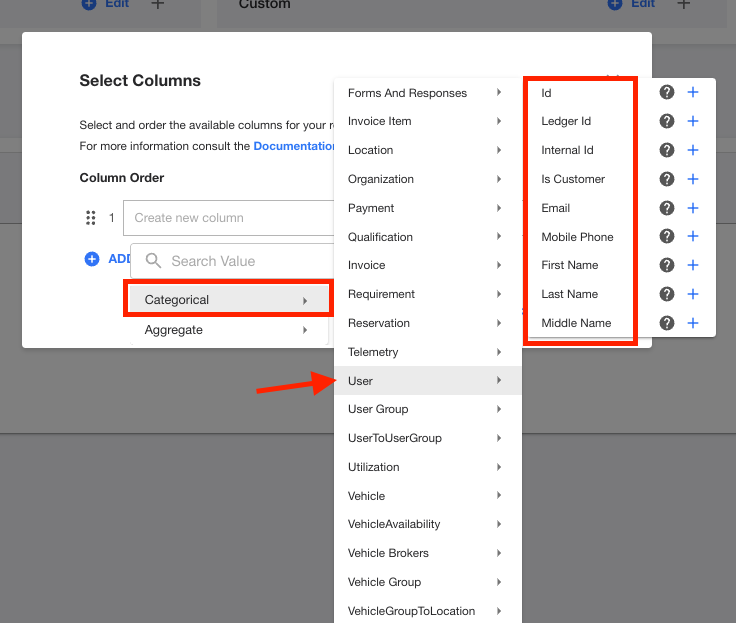
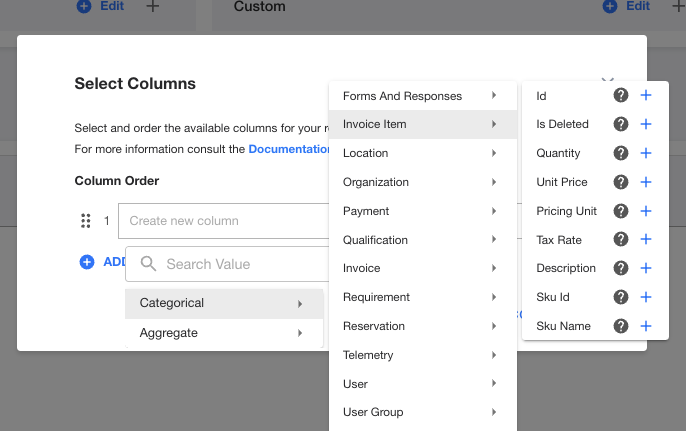
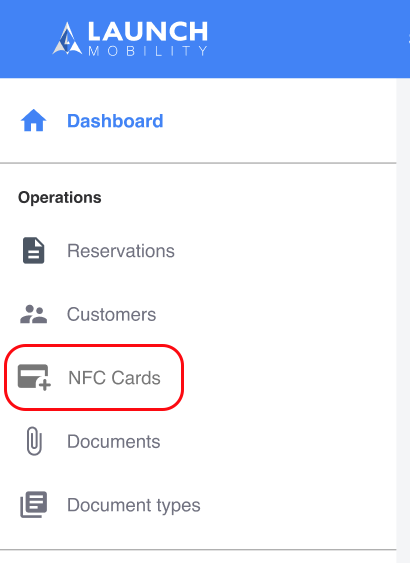
Managing NFC Cards in Mission Control

· 3 min read

Description

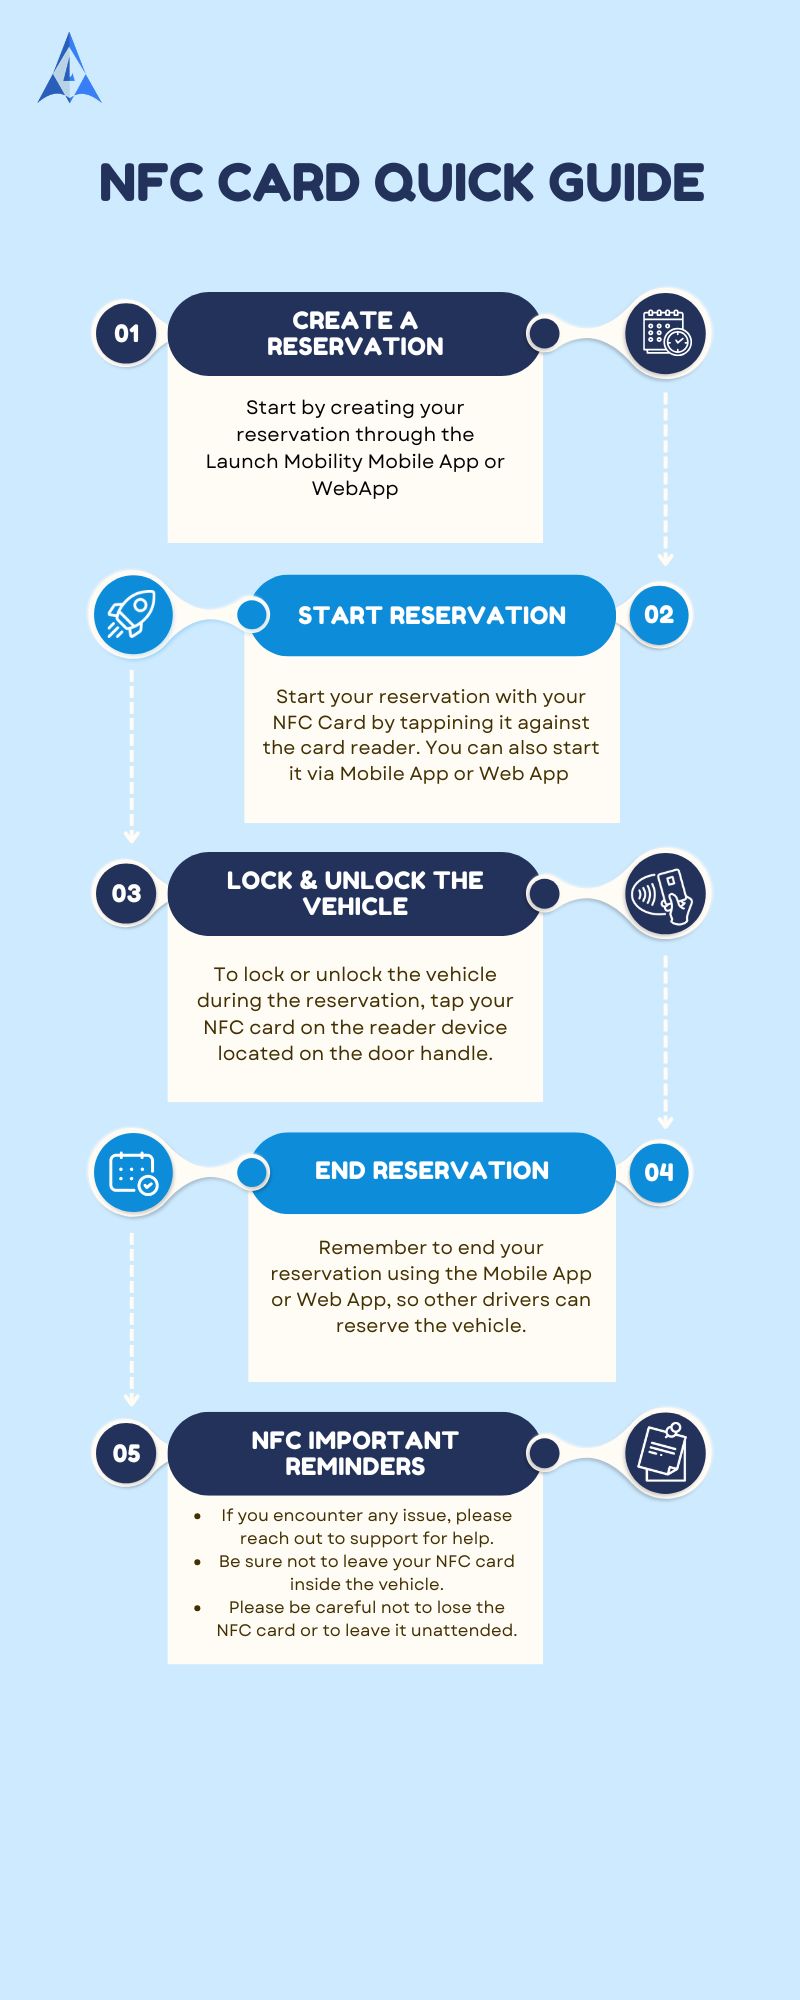
NFC (Near Field Communication) cards are contactless smart cards that allow users to unlock and start vehicles with a simple tap.

Purpose

Simplify NFC card management, enhance vehicle access control, and improve operational efficiency with our intuitive Mission Control interface.

Benefits

  • Save time: Streamline card management tasks and reduce administrative overhead.
  • Improve security: Maintain control over vehicle access and prevent unauthorized use.
  • Gain insights: Track card usage and make data-driven decisions to optimize your operations.

Limitations

  • No Support for Ending Reservations with NFC Cards: NFC cards cannot be used to end reservations, ensuring that workflows are completed through app-based or admin-assisted methods for consistent reservation management.

Registering an NFC Card

In this flow, you'll learn how to register a new NFC card in Mission Control. Assigning a card to a user during this flow isn't required. This will allow you to create a profile for a number of cards and then assign them as drivers are added to the system.

1. Select NFC Cards in the navigation menu.

2. Click the Register NFC Card in the upper right hand corner.

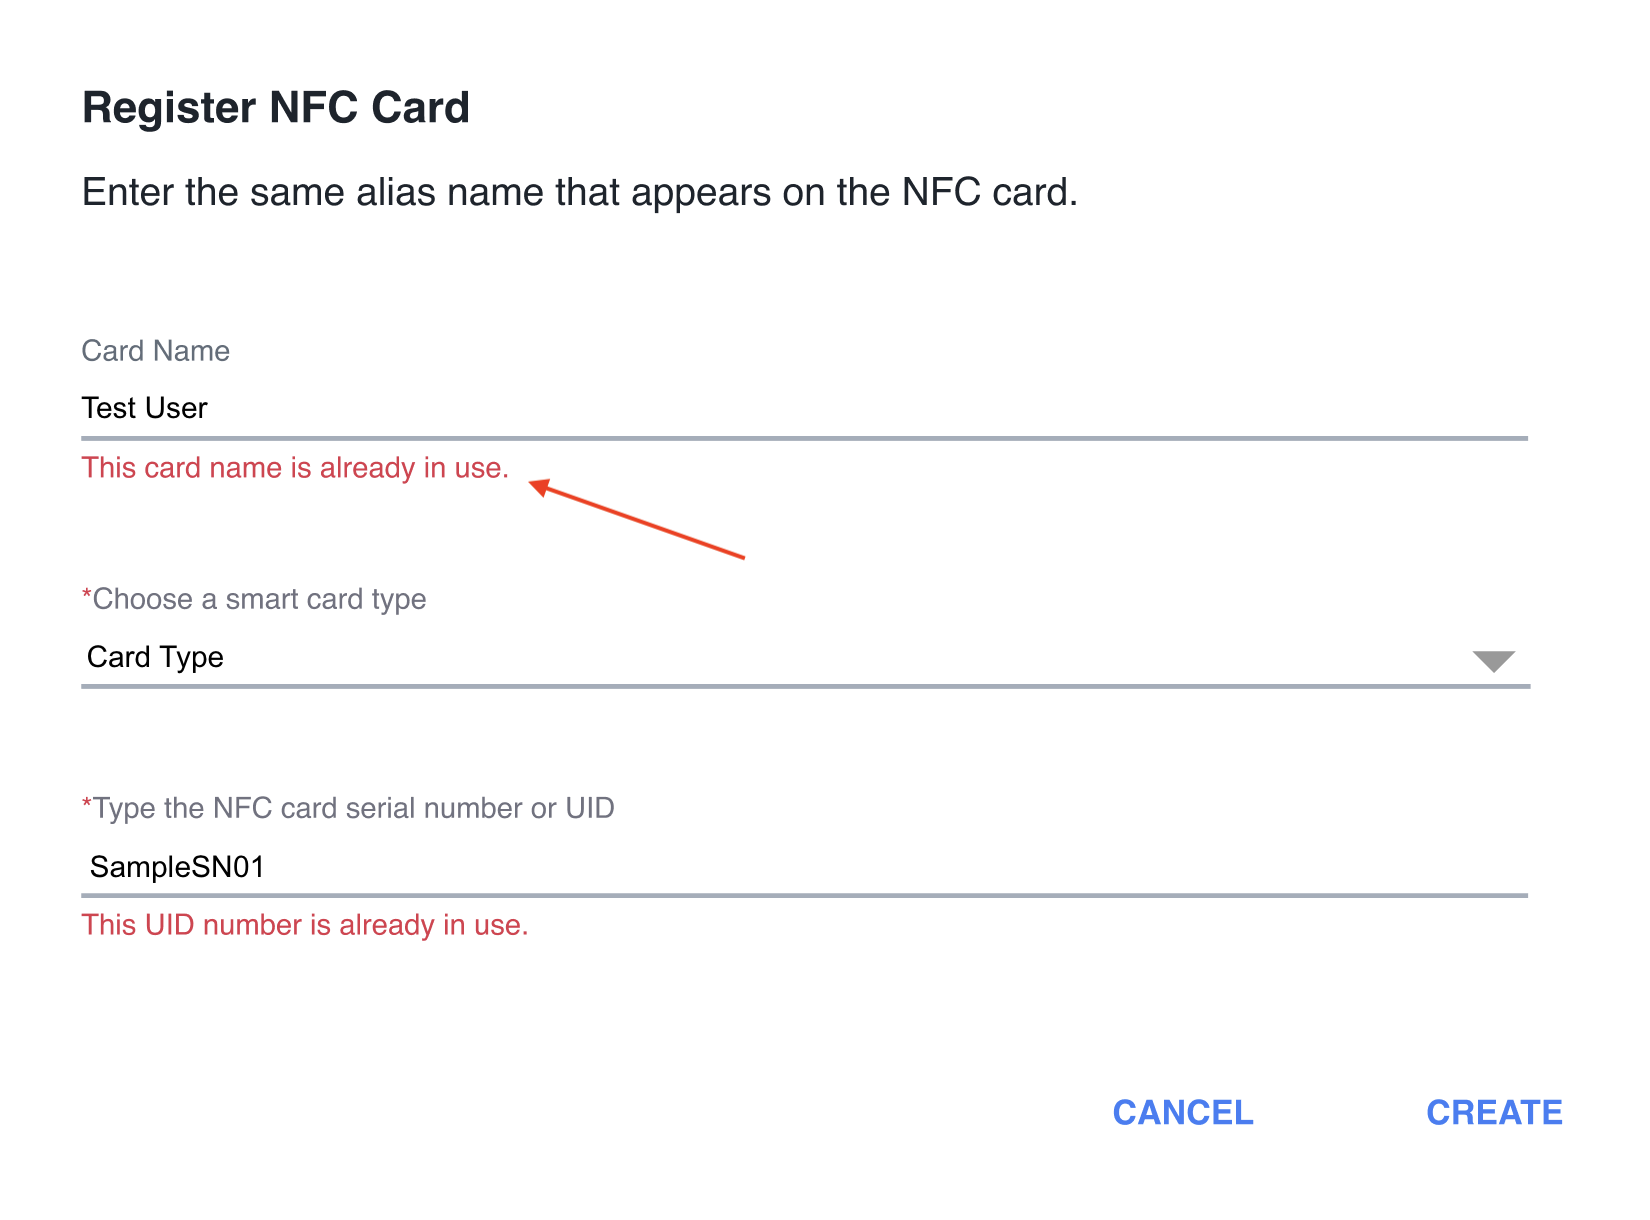
3. Enter a name for the NFC card. (Optional)

If the name you've entered is already in use, an error message will appear.

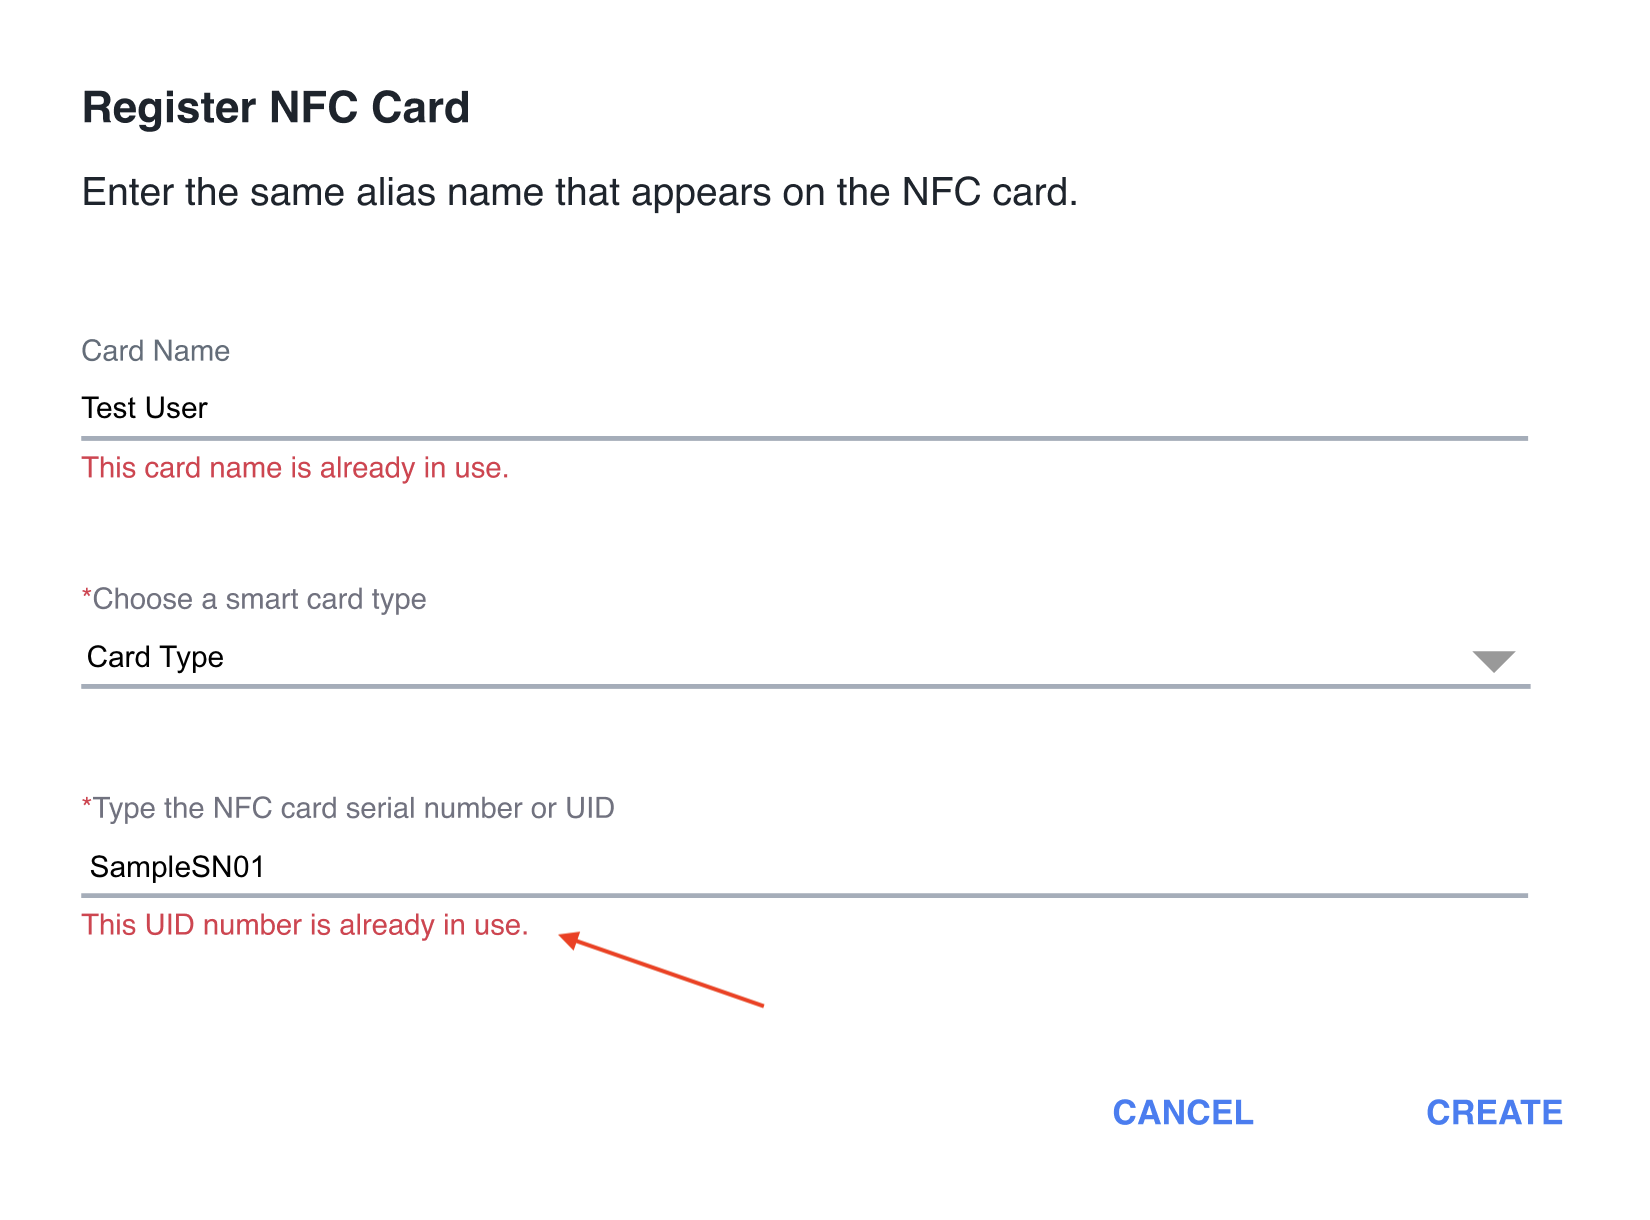
4. Select a card type.

Select a card type from the drop down of supported providers. Enter the card's serial number or unique ID (UID). If the entered serial number/UID is already registered, an error message will appear.

5. Click the "Create" button.

6. Assign the NFC card to a user. (Optional)

  • Select a user group from the dropdown menu in order to narrow down the list of options for drivers.

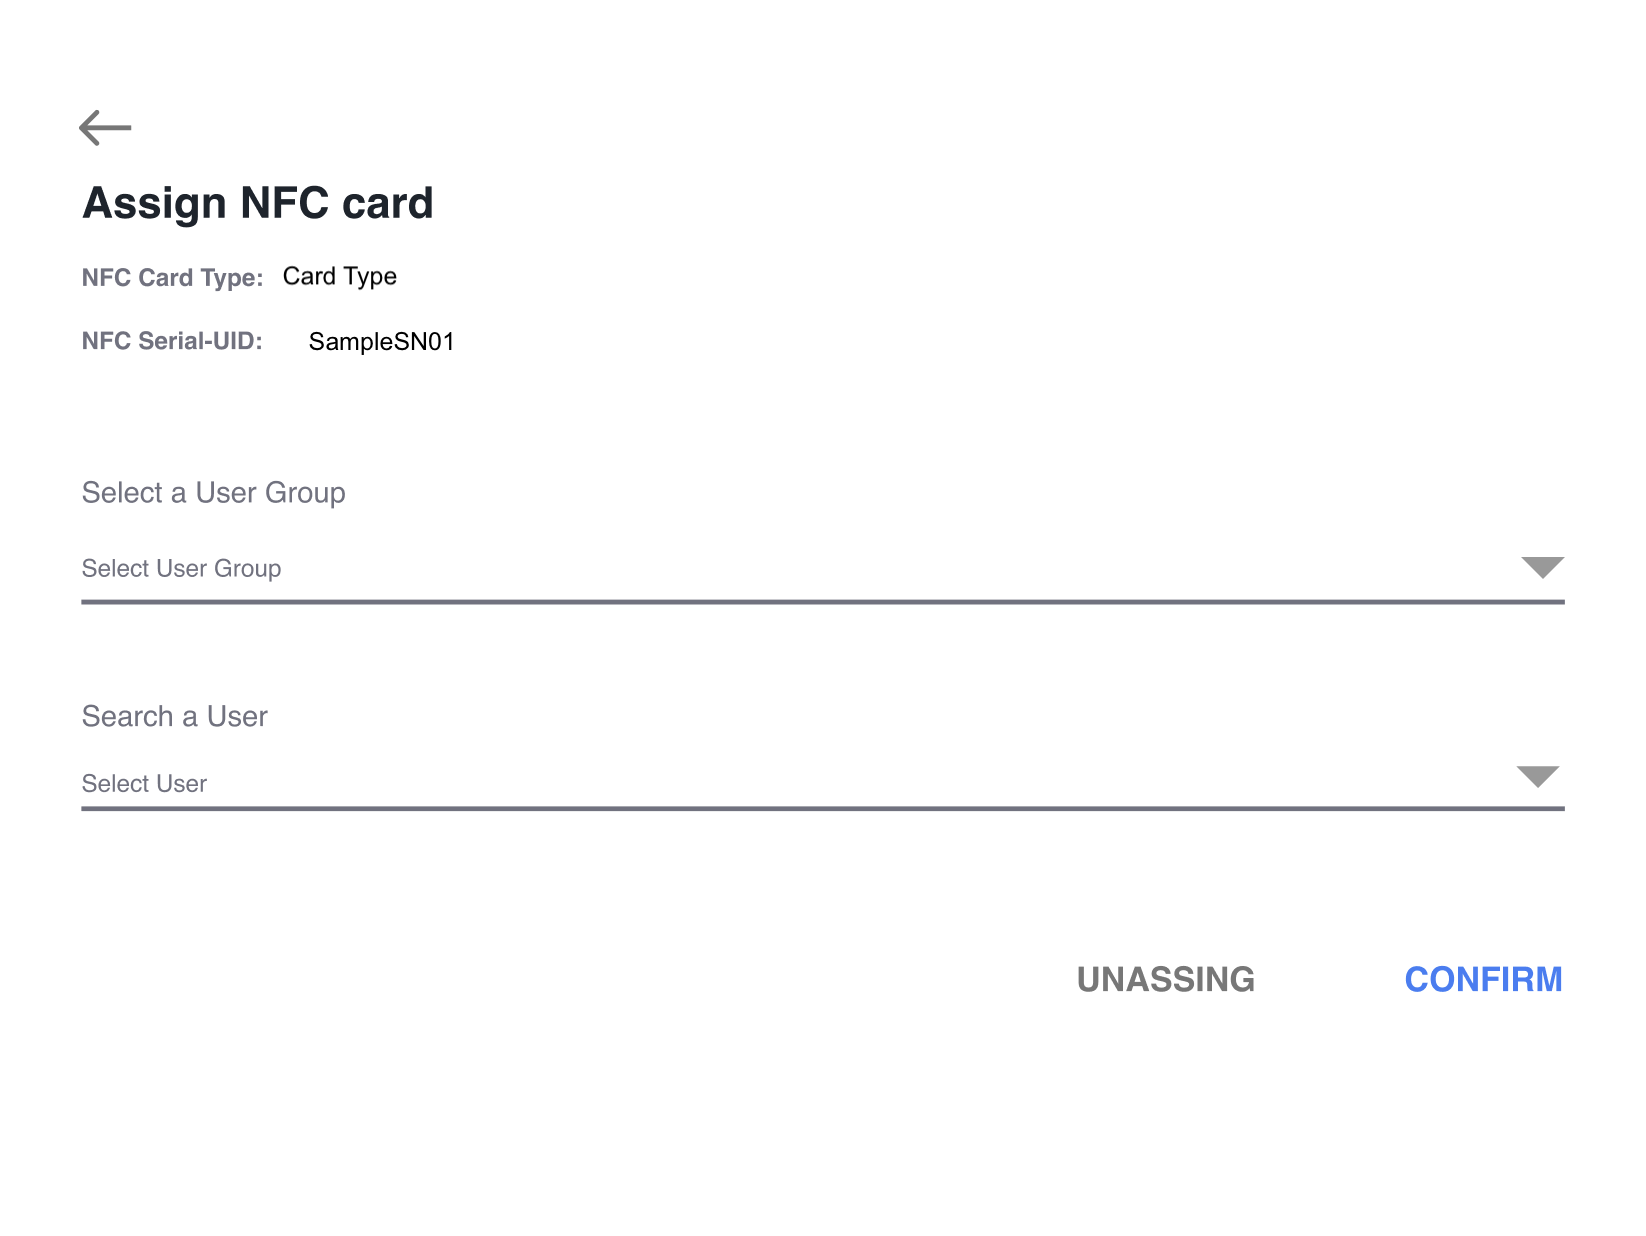
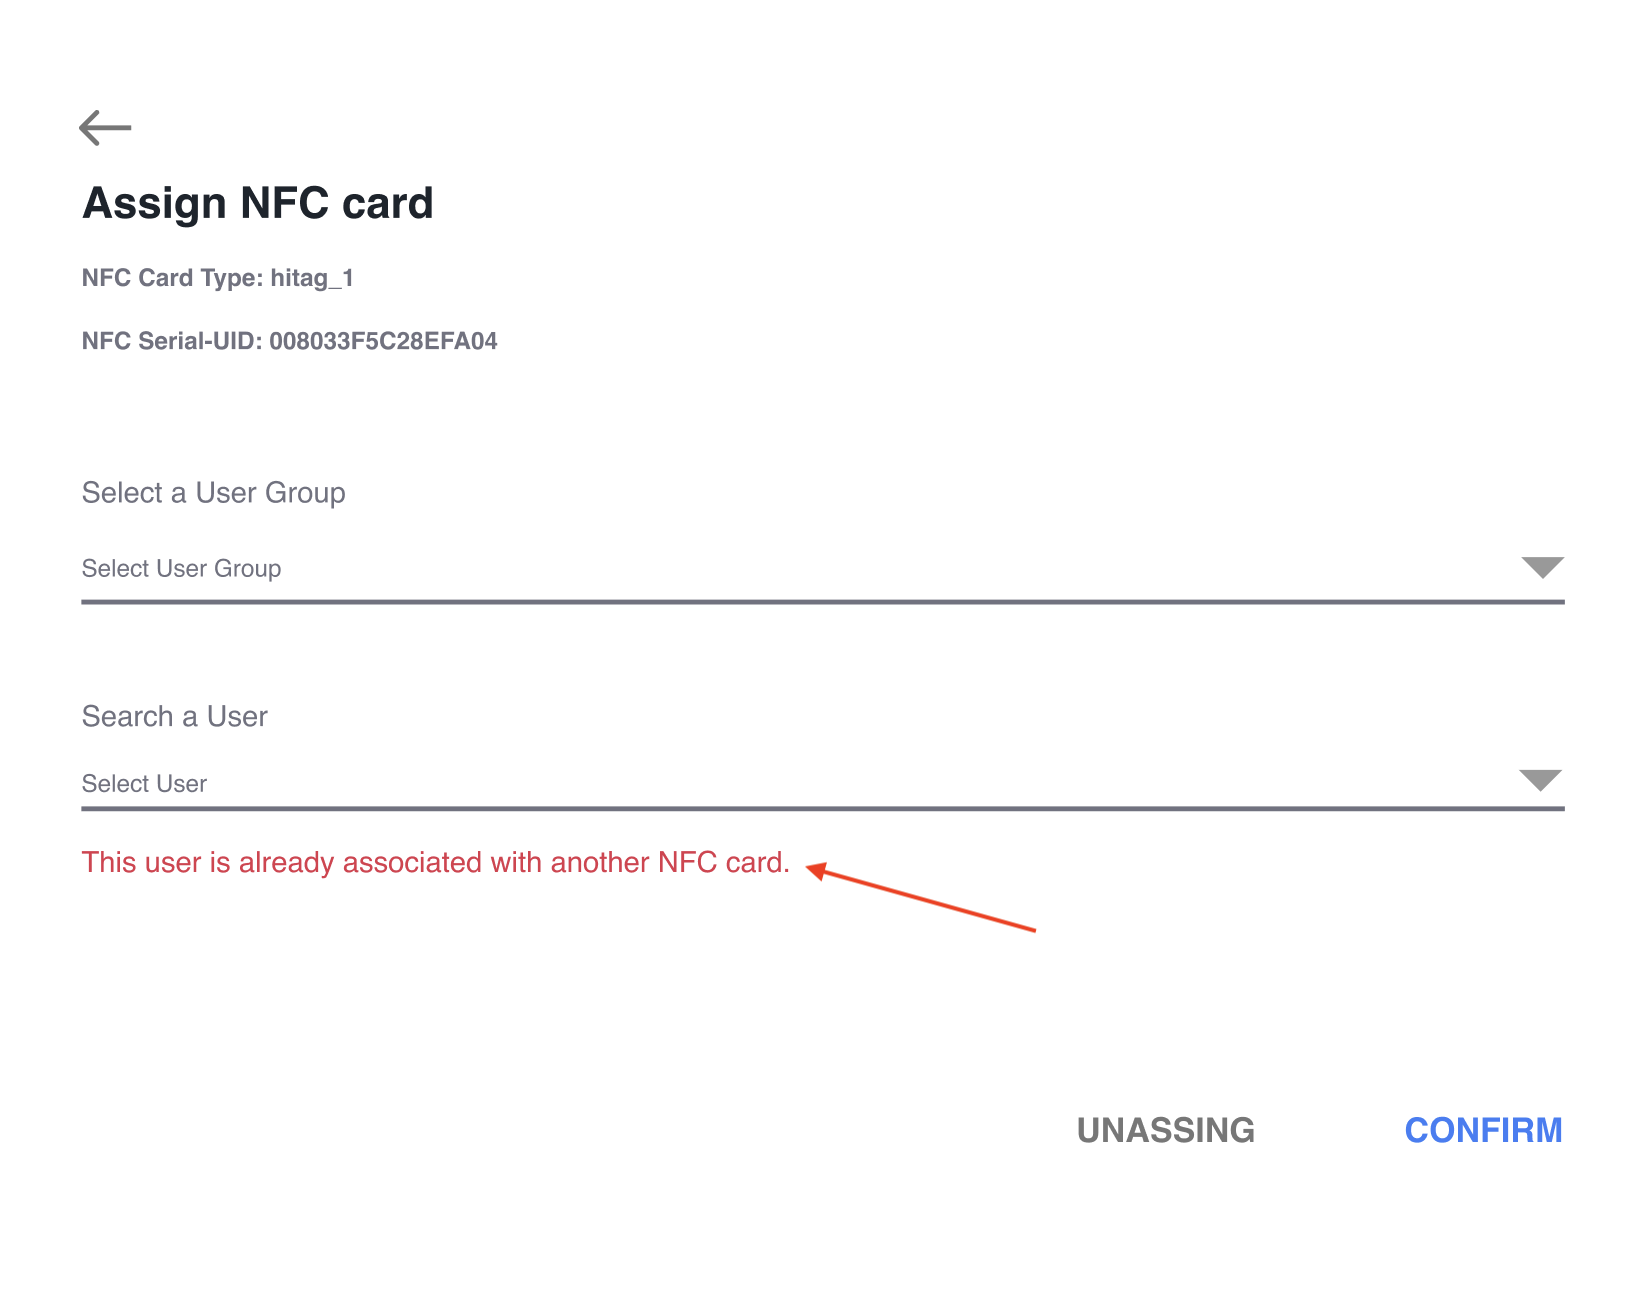
  • Select a driver from the dropdown by searching by ID, name or email. If you enter a name of a user already associated with another NFC card, an error message will appear.

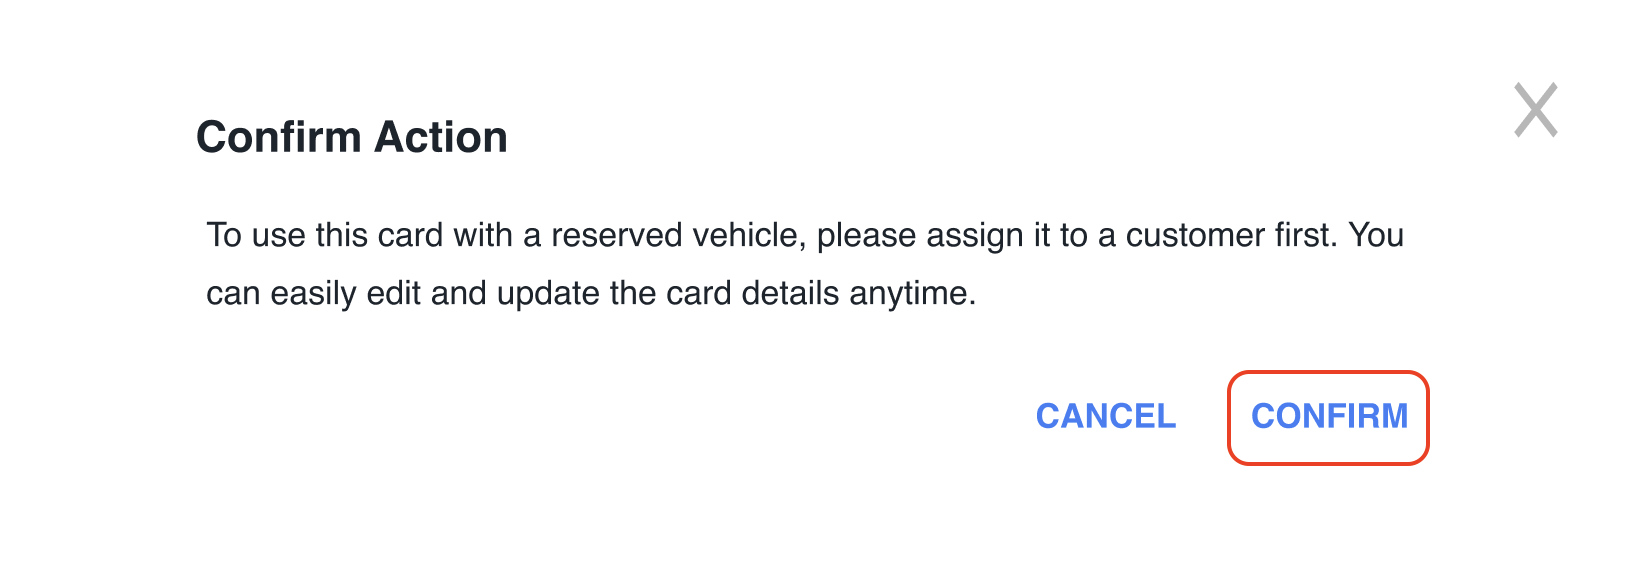
7. Confirm the assignment.

  • If you assigned the card to a user, you will be asked to confirm before the process is completed. Click the Confirm button. Please note that the card will need to be assigned to a user in order for it to be used to access a vehicle.

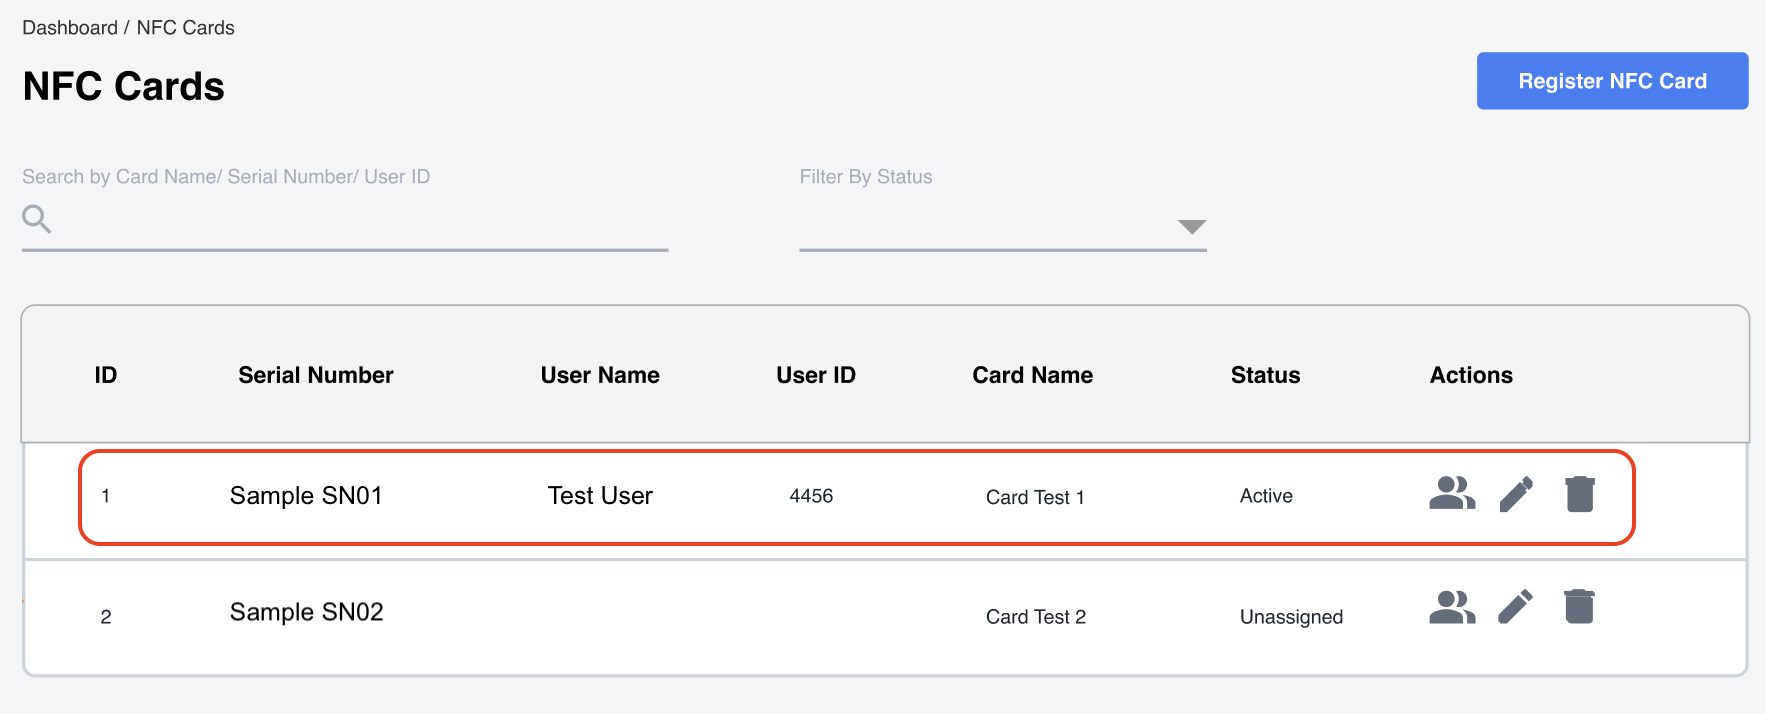
  • You can edit an NFC card's record and add a user at a later time by selecting the edit icon in the Actions column.

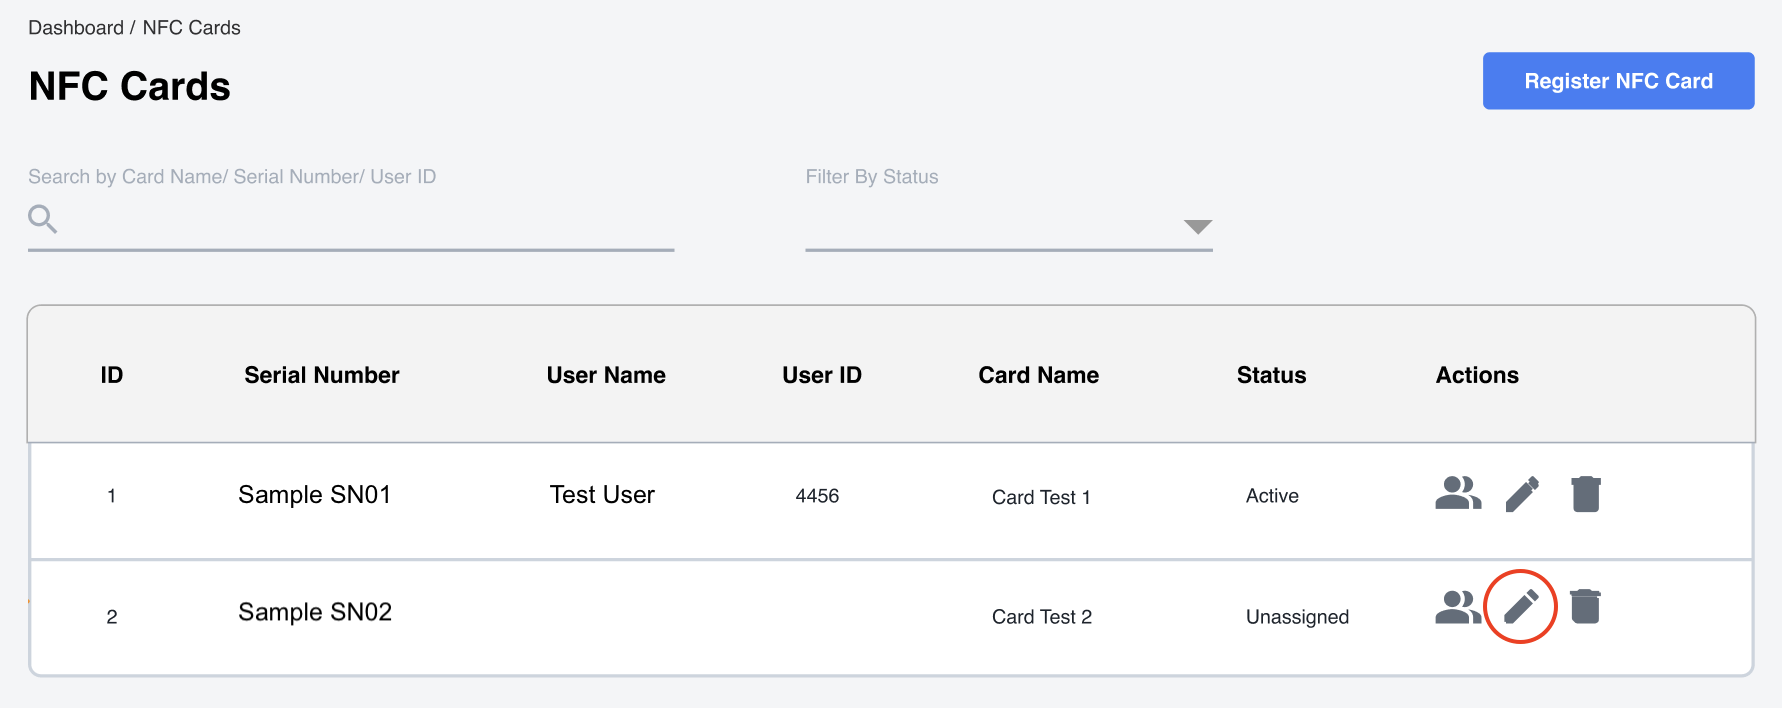
8. View your NFC card on the list.

Once you've completed this process, the card will appear on the NFC Cards list.

Completing this process will give your drivers another option to access their vehicles when/if their mobile device isn't available.

NFC Card Driver Flow

· 2 min read

This documentation is meant to clarify the NFC card flow for drivers. This is very useful information for new drivers who will use an NFC card on a regular basis.

Description

NFC (Near Field Communication) cards allow drivers to start reservations and lock/unlock vehicles, ensuring quick and reliable vehicle access.

  • NFC Card: An NFC card is a type of contactless smart card that uses radio-frequency technology to exchange data with compatible readers. In this case, when users tap the card against the RFID (Radio Frequency Identification) reader in the vehicle door, they will be able to start reservations and lock/unlock a vehicle.

Purpose

  • Enable Seamless Vehicle Access: Provide drivers with a fast and offline-capable method to access vehicles, independent of mobile app installation or connectivity issues.
  • Optimize Reliability in Challenging Environments: Address potential network reliability challenges by offering an offline-capable NFC-based solution, ensuring robust vehicle access without dependence on cellphone connectivity.

Benefits

  • Improved Driver and Admin Experience: Simplifies the vehicle access process for drivers, ensuring quick entry if their mobile device isn't available.
  • Enhanced Reliability and Resiliency: Reduces dependency on potentially unreliable network conditions by allowing NFC cards to function offline for starting reservations and locking/unlocking vehicles.

Limitations

  • No Support for Ending Reservations with NFC Cards: NFC cards cannot be used to end reservations, ensuring that workflows are completed through app-based or admin-assisted methods for consistent reservation management.

Flow

  1. Reservation Creation

A reservation needs to be created in either the mobile app or the web reservation app (WRA) prior to accessing the vehicle using an NFC card.

  1. Start Reservation

A reservation can be started in the mobile app, in the WRA or by tapping the NFC card on the RFID reader installed in the vehicle.

  1. Locking/Unlocking the Vehicle

During an ongoing reservation an NFC card can be used to lock and unlock a vehicle by tapping it on the RFID reader.

  1. End Reservation

Ending a reservation using the NFC card isn't currently supported. In order to end a reservation a driver must either use the mobile app or the WRA. An admin can also end a reservation on a driver's behalf in Mission Control.

Below is a diagram showing the flow for an NFC card during our reservation flow.

Alarms/Notifications Overview

· One min read

Overview:

Emails and SMS (text messages) are available in our platform. Below you will find the list of all available to you with our default settings.

This is a list of the alarms/notifications, along with a description and an example of the email and/or SMS message that is sent on the alarm is triggered.

EV Charging Status in Mission Control

· 2 min read

New Feature Enhancement Alert!

What’s New?

We’ve listened to your feedback and have now added Real-Time EV Plug Status Monitoring in Mission Control in Vehicle Details! 🌟 Now, you can easily check whether your EV plug is securely connected at a glance. This enhancement is designed to keep you informed about the plug's status, ensuring that your maintenance tasks are carried out seamlessly and that future reservations remain unaffected.

Why Is This Important?

Knowing whether your EV plug is properly connected is crucial for smooth operations and to prevent any interruptions. With this new feature, you’ll be able to:

  • Avoid Unnecessary Hassles: Quickly verify if the EV plug is in place, so you can take immediate action if needed.
  • Streamline Maintenance: Make informed decisions about when and how to perform maintenance without having to guess or manually check.
  • Ensure Uninterrupted Service: Prevent any disruptions to future reservations by addressing plug status issues before they impact your operations.

How It Works:

Mission Control now provides real-time updates on the EV plug status, allowing you to see if it’s plugged in or not right from your dashboard. It’s intuitive and easy to use, so you can focus more on what matters and less on troubleshooting.

We’re excited about this enhancement and believe it will greatly improve your experience.

Here are the three different telemetry views you will see based on the type of vehicle (Hybrid, EV, or Fuel)

Vehicle Details | Telemetry for Hybrid

Vehicle Details | Telemetry Details for Electric Vehicles

Vehicle Details | Telemetry for Fuel Vehicle

As always, we’re here to support you with any questions or feedback you may have. Contact us at operations@launchmobility.com for more information!

Reservation Rulesets (RRS) Overview

· One min read

Overview:

Configuring Reservation Rulesets (RRS) will allow you to define rules that your program will abide by. Each RRS will contain a definition with details about how this will affect your service.

These RRS can be measured in minutes, hours, days, weeks or months.

There are RRS for different aspects of your service:

  • Reservation Times - These control basic rules for reservations created by drivers, such as minimum and maximum allowed duration.

  • Cancelation Policy - You can specify if you'll charge for cancelations and configure the amount.

  • Other - Miscellaneous rules can be configured.

  • App Reservation - You can set default information for what's visible in the app during reservation creation.

Here is a list of default values.

Below is a list of all the configurable Reservation Rulesets (RRS) in Mission Control. Each RRS is accompanied by a description of its function, along with a best practice recommendation.

Setting the Timeframe in Mission Control Reports

· 2 min read

Mission Control allows you to analyze data within specific time periods. This article will guide you through two ways to set the timeframe for your reports:

Creating a New Report with a Specific Timeframe:

  1. Navigate to Reports: Begin by clicking on the Reporting tab in Mission Control.
  2. Create Your Report: Click the "Create a report" button to initiate building your report.
  3. Customize Your Report: Add the desired columns and filters to tailor your report to your specific needs.
  4. Set the Timeframe: Locate the "TIME" column. Click the "edit" option next to it. This opens the timeframe selection window.

  1. Refine Your Timeframe: Within the window, you have three key options to define your timeframe:
    • Dimension: This determines the level of granularity for your time periods (e.g., Day, Week, Month, Year).
    • Timeframe: Choose the specific period you want to analyze (e.g., Last 7 Days, Last Month, Year to Date).
    • Grouping Preference: Select how you want your data grouped within the chosen timeframe (e.g., Daily, Weekly, Monthly).

  1. Save Your Work: Once you've set your desired timeframe and any other report customizations, click the "Save" button to preserve your report.

Editing the Timeframe of an Existing Report:

  • Locate Your Report: Find the report you want to modify within the reporting section of Mission Control.

  • Edit the Timeframe: Click the "edit" button displayed in the "Time" section of your chosen report.

  • Refine the Timeframe: Similar to creating a new report, use the editing window to adjust the Dimension, Timeframe, and Grouping Preference.

  • Save Your Changes: Don't forget to click "Save" after making your edits to ensure the timeframe updates are reflected in your report.

By following these steps, you can easily control the timeframe for your Mission Control reports, allowing you to analyze data for the specific periods relevant to your needs. Remember, saving your report is crucial to ensure your timeframe selections and other customizations are applied.

If you have any questions about creating or editing your report, please contact your Launch Mobility Account Manager for assistance.

Top Reports from Mission Control

· 5 min read

Essential Reports from Mission Control

Keeping your fleet running smoothly is all about using the right tools. Mission Control allows you to generate reports that can give you valuable insights into how your fleet is performing, helping you make better decisions and save money.

The reporting tool can be found under the Report Management section of the left navigation menu.

To generate any report, you'll begin by creating the report with the information you'd want to see.

Let's dive into five key reports Mission Control offers and see how they can benefit you:

Utilization Report

The Utilization Report shows you how often each vehicle in your fleet is actually being used. This helps you identify vehicles that might be sitting idle and could be redeployed elsewhere.

To generate a Utilization Report, begin by creating your report.

  1. Click in the "Create Report" button on the top right of the screen.
  2. Select and order the available columns for your report. You can select by category or by an aggregate identifier.

With each category, you're able to drill down into the specifics of the information you'd want to appear on your report.

The aggregate selection allows you to pull data such as invoices, user groups, or by vehicle.

Once you've selected the data you want displayed in your report, you can reorder the columns as needed and save.

You'll then be able to preview, and even export your new report.

Your reports are saved in a user-friendly view for future easy access.

Here are a few other reports that you may find helpful:

Mileage Report

The Mileage Report keeps tabs on how far your vehicles travel. This is important for several reasons. You can see which vehicles are clocking the most miles, helping you plan for maintenance needs. It can also help you optimize routes and potentially reduce fuel costs. Think of it as a way to keep your fleet in tip-top shape and avoid any unnecessary wear and tear.

Steps to create report:

  1. After clicking the "create report", start building your report by creating new columns using the categories.
    1. Location - Allows you to define the location of the vehicle

    2. Telemetry - To add telemetry data to the report

    3. Vehicle ID - To identify the specific vehicle

    4. Odometer Time - To add the mileage data to the report

Additional fields you could add are the Vehicle category where you can drill down to the type of vehicle, year, make and model.

Location Report

Ever wonder which of your locations are the busiest? The Locations report gives you the answer! By seeing how many rentals happen at each branch, you can gain valuable insights. Maybe a location is booming and needs more vehicles, or perhaps another one is underperforming and could benefit from a marketing push. This report helps you make informed decisions about resource allocation, ensuring your busy bees have the tools they need to succeed.

Steps to create report:

  1. After clicking the "create report", start building your report by creating new columns using the categories.
    1. Location - Allows you to define the location of the vehicles
    2. City - To determine which city is the busiest

Secondly, you'll want to add more depth to your report by including some aggregate data.

  1. Click the Aggregate tab and select Utilization.
  2. The Utilization menu will provide you with a number of variable to use in your report for more location insights.

Customer Fees Report

Sometimes, little things can add up. The Fees Report helps you understand what types of fees are being applied most often to your rentals. Are there late return fees popping up frequently? Maybe a friendly reminder about return times is needed. This report sheds light on potential areas where you can streamline processes or educate customers, ultimately saving everyone time and money.

Steps to create report:

  1. After clicking the "create report", start building your report by creating new columns using the categories.
    1. User - Allows you to select the necessary customer data you need in your report.

Next, create a new category for invoice items and select the SKU ID or SKU Name to see the types of fees that have been applied.

Alarms Report

Let's face it, unexpected things happen. The Alarms Report gives you a clear picture of which customer alarms were triggered (or not triggered) and how often. This can be helpful in a few ways. Maybe there's a specific vehicle with a finicky alarm that needs attention. Or, perhaps the report reveals a location where extra security measures might be beneficial. By staying informed about alarms, you can proactively address any potential issues and ensure the safety of your fleet.

Remember, Mission Control is your command center!

By utilizing these reports regularly, you can gain valuable insights into your fleet's performance, optimize resource allocation, and make data-driven decisions that keep your fleet running smoothly and efficiently. So, buckle up and get ready to unlock the full potential of your fleet with Mission Control!